Using Slices
Support for the Gatsby Slice API was added in
gatsby@5.0.0.
To further the improvements seen by Incremental Builds, Gatsby includes the Slice API that allows you to split pages into individual parts.
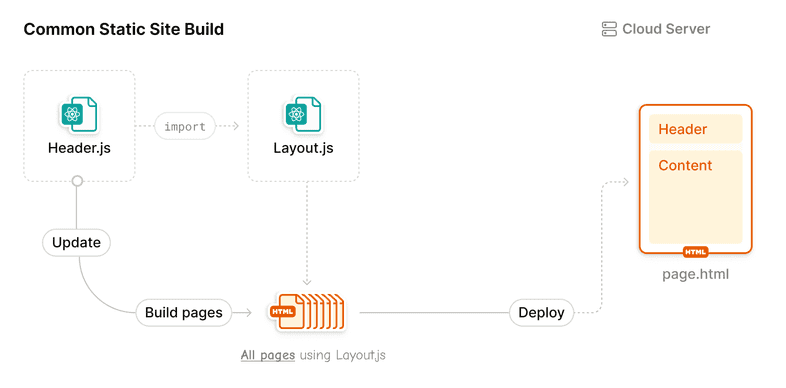
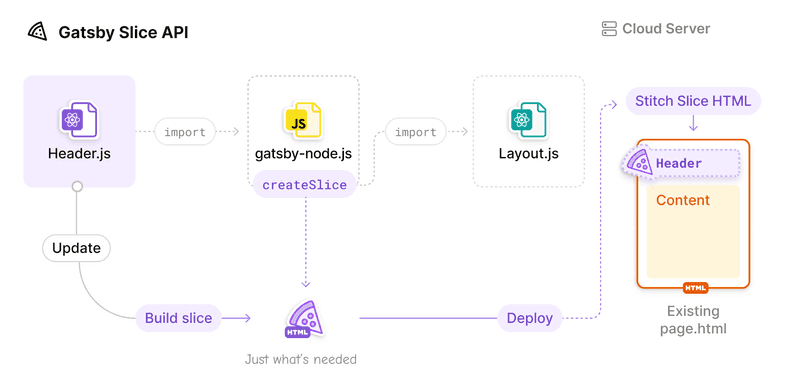
By using the <Slice> React component in combination with the createSlice API for common UI features, Gatsby will be able to build and deploy individual pieces of your site that had content changes, not just entire pages. In today’s frameworks, when you re-order the header content, the entire site needs to be rebuilt. However, if the header was created as a Slice component, the new header content only need to be built once and all pages will pull the new header when it’s needed.
The <Slice> React component is also referred to as “Slice placeholder”. The React component you pass to createSlice via its component key is also referred to as “Slice component”.
Faster builds in Gatsby Cloud
With the introduction of Incremental Builds, Gatsby Cloud has been able to reduce build times signficantly by only building the pages that changed. With Slices, we’ve seen improvements in build time by up to 20%. With Gatsby Cloud Enterprise, however, your Slice component changes can build up to 90% faster. By knowing the intricate details of your site and the Slices within it, Gatsby Cloud can build and deploy the exact pieces needed to get your site updated with the latest content.
Using Slices in your site
For this example, let’s use the same scenario as described above - a large site that has a shared header. You’ll use this component as your Slice component.
When a Header change is issued, this what a build looks like:
Using the Slice component in gatsby-node
You can create a Slice by using the createSlice action from the createPages API in your gatsby-node. Pass the previously created Slice component via the component key and give the Slice component a unique id.
Now that you have a header Slice component created, let’s go use it!
Using the Slice placeholder
Now you need to convert the DefaultLayout component to actually use the new Slice component you created. By importing the <Slice /> React component from gatsby and placing the Slice placeholder inside <DefaultLayout />, you can use the previously created Header Slice component.
After a successful gatsby build, you should see a list of Slices that were built for your site. We’ve created a Slice!
Now, when a Header change is issued, this what a build looks like:
Using sliceContext
Similar to the context that can be passed to pages in createPages, createSlice can also pass context to individual slice components.
The data passed to context here will be handed down to the Header Slice component with the key sliceContext.
Querying Data
Data can be queried the same way you can run queries within pages. These are called “slice queries” (as opposed to page queries).
In this example, let’s say you want to pull all header items from your CMS.
When Gatsby builds, this query will be ran and passed to Header within the data prop, just like page queries.
Slice queries can also accept parameters from the context passed to createSlice.
Using Aliases
There will be times where a single Slice will either need to be handed different context or swapped entirely depending on which page it’s being rendered on.
This is where you can utilize the alias prop that is given to the <Slice> placeholder. When you converted the <Header> component to a Slice component, you created the Slice component with an id of header, but passed that value to the alias prop of the <Slice> placeholder. Why is there a difference in key names?
An alias is not a 1-to-1 mapping of string-to-slice. When you create a page using createPages, you can pass a key-value map of alias-to-id to tell Gatsby which Slice component to use throughout the page.
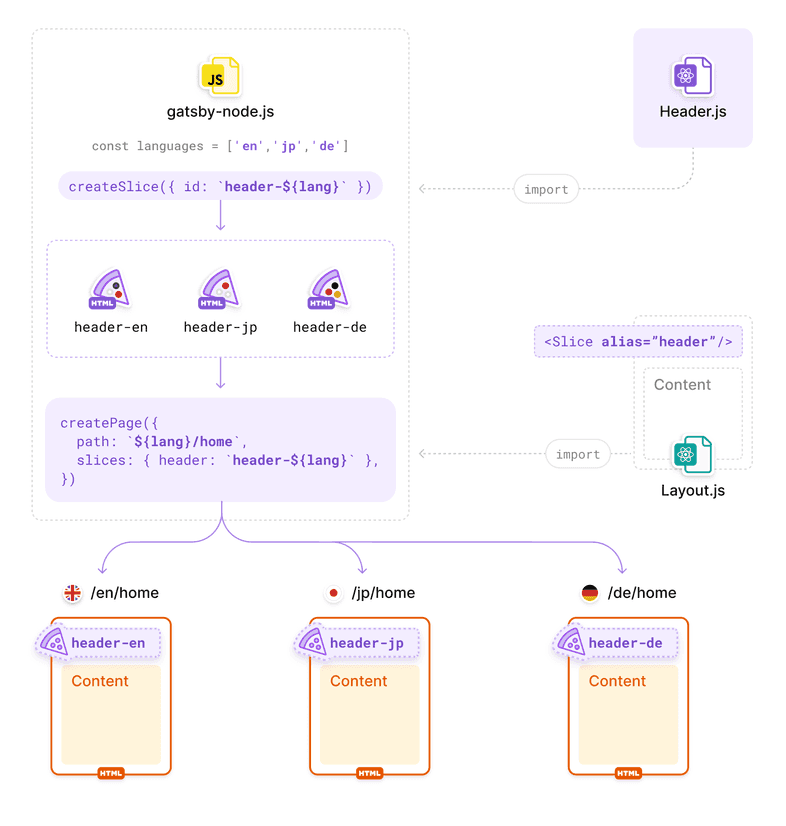
One common use case for this is localization. It’s common to iterate over languages to create a page for each one. You can create a Slice for each language by passing context. The id that a Slice component is created with will be passed to createPage to tell each page which Slice component to use.
In this example, you create a Slice component of <Header> for each supported language. When you create each page, Gatsby will tell the page which header to use based on the language of the page Gatsby is creating.
To better visualize how aliases are working in this case, check out this diagram:
Testing Slices
As explained in the Unit Testing guide you’ll want to mock the gatsby module, including the Slice placeholder. With this configuration the Slice placeholder will be replaced with a <div> that has the alias mapped to the custom data attribute called data-test-slice-alias.


